


Have you ever wanted to build a smart device that can send information without wires? Maybe you want to check the temperature in your garden from inside your house, or create a system that watches several rooms at once. The Antennino board can help you do this easily. Let me tell you all about it.
What is Antennino?
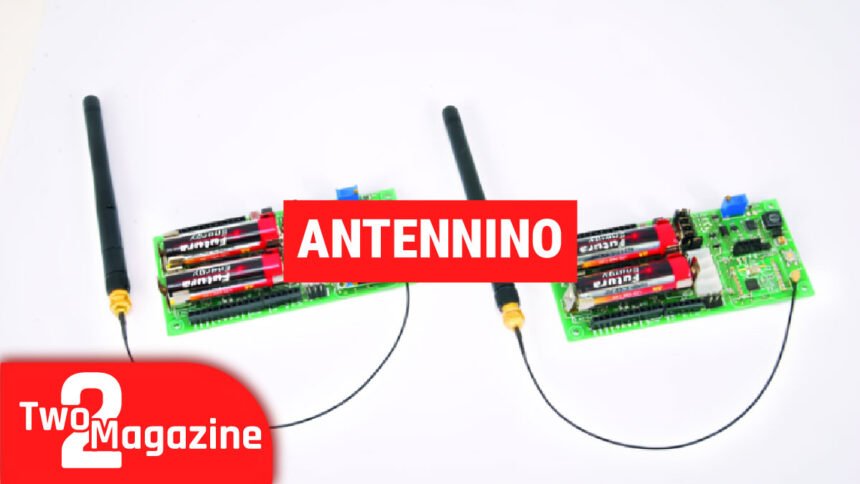
Antennino is a special type of electronic board. The name comes from two words: “Antenna” and “Arduino.” It’s like a regular Arduino board, but with a built-in radio that can send and receive information wirelessly.
Think of it as a tiny computer that can talk to other devices without any cables. This makes it perfect for creating smart home projects, weather stations, or any device that needs to share information over distance.
Why Was Antennino Created?
When people build electronic projects with regular Arduino boards, they often face a problem. If they want their device to communicate wirelessly, they need to add extra parts. This means:

- More wiring to connect
- More power needed from batteries
- More time spent setting everything up
- Higher costs for all the parts
Antennino solves this problem by putting everything you need on one small board. It saves you time, money, and makes your projects simpler.
The Main Parts Inside Antennino
Let’s look at what makes Antennino work:
The Brain: ATmega328P Chip
The heart of Antennino is a chip called ATmega328P. This is the same chip used in the popular Arduino Uno board. Here’s what this chip can do:
- It has 32KB of memory to store your programs
- It works with voltages from 1.8V to 5.5V
- It has 23 input/output pins for connecting sensors
- It includes special features for saving power
Because it uses the same chip as Arduino Uno, you can use the same free programming software (Arduino IDE) that millions of people already know. This makes learning Antennino very easy if you’ve used Arduino before.
The Radio: RFM69 Module
The special part that makes Antennino different is the RFM69 radio module. This module works at 433MHz frequency. Here’s what you need to know:
How Far Can It Send?
- In open outdoor spaces: up to 500 meters (about 1,640 feet)
- Inside buildings: over 50 meters through walls
- With better antennas: possibly up to 5 kilometers
Why 433MHz is Good:
- It uses less power than Wi-Fi
- It can send signals farther than Bluetooth
- It works in most countries without special permission
- It goes through walls better than higher frequencies
The radio module can send information at different speeds. You can choose to send data faster for nearby devices, or slower for devices that are far away. Slower speeds use less power and reach farther.
Sensors Already Included
Antennino comes with two sensors built right into the board:
- Temperature Sensor (DS18B20): This measures how hot or cold it is
- Light Sensor (Photoresistor): This measures how bright or dark it is
This means you can start collecting useful information right away without buying extra parts.
Memory for Storing Data
Antennino has a Flash memory chip (AT25F512B) that can hold 512 kilobits of information. You can use this memory for two important things:
- Save sensor readings: Store temperature or light data over time
- Update programs wirelessly: Change the program running on your Antennino without connecting any wires
Easy Ways to Connect More Sensors
The board has four special connectors called Grove connectors. These make it simple to attach additional sensors or devices:
- One for I²C communication (for smart sensors)
- One for RS232 communication (for older devices)
- Two for general inputs and outputs
You can also connect a small OLED screen to display information. This is useful if you want your Antennino to show data directly.
How Antennino Gets Power
One of the best things about Antennino is how flexible it is with power. You have three choices:
Option 1: Regular Batteries
You can use two AA batteries (either 1.5V alkaline or 1.2V rechargeable). The board already has clips to hold the batteries, so you don’t need extra parts. This is great for devices you want to put outside or in places without electrical outlets.
Option 2: External Power Source
You can connect any power source between 3.6V and 12V. This works well if your device stays in one place and you want reliable power.
Option 3: Direct 3.3V Power
If you have a precise 3.3V power source, you can connect it directly. However, be very careful! If you use more than 3.3V with this method, you will damage the board permanently.
Two Ways to Use Antennino
The clever design of Antennino means you can use the same board in two different ways:
As a Remote Sensor (Peripheral Mode)
In this mode, Antennino sits in a location collecting information from its sensors. For example:
- In your garden measuring temperature and soil moisture
- In your basement checking for water leaks
- On your roof monitoring weather conditions
The board wakes up, takes measurements, sends the data, and goes back to sleep to save battery power.
As a Central Hub (Gateway Mode)
In this mode, Antennino collects information from other devices. You might:
- Connect an OLED display to show all the data
- Use a USB connection to send data to your computer
- Plug it into power so it never runs out of battery
One gateway can receive information from many remote sensors, creating a complete network.
Real Projects You Can Build
Here are some practical things you can make with Antennino:
Home Weather Network
Place several Antenninos around your property to measure temperature, humidity, and light. One central Antennino collects all this information and displays it on a screen or sends it to your computer.
Smart Garden Monitor
Put Antennino boards in your garden to track soil moisture, temperature, and sunlight. When plants need water, the system can alert you or even turn on sprinklers automatically.
Building Monitoring System
Use multiple Antenninos to watch different rooms in a building. They can check temperature, detect motion, or monitor when doors open. All information goes to one central location.
Energy Saving System
Place sensors in different rooms to measure light and temperature. The system can automatically adjust heating, cooling, or lights to save energy while keeping people comfortable.
Farm or Greenhouse Automation
Monitor conditions in greenhouses, barns, or fields. The long range means you can check distant locations without running cables everywhere.
People Also Read: What Is Crypto30x.com Ocean? A Simple Guide to This High-Risk Trading Platform
Working with Antennino: What You Need to Know
Programming Is Easy
If you’ve never programmed before, don’t worry. The Arduino platform makes it friendly for beginners:
- Download the free Arduino IDE software on your computer
- Connect your Antennino using a USB-to-serial adapter
- Write your program (or use examples that others have shared)
- Click “upload” to put the program on your Antennino
There are thousands of free example programs and helpful guides online. The Arduino community is very friendly and willing to help beginners.
Low Power Features
One of Antennino’s best features is how little power it uses. The ATmega328P chip has special “sleep” modes. In these modes, the board uses very little energy:
- The chip can wake up at specific times
- It takes measurements quickly
- It sends the data
- Then it goes back to sleep
This means your batteries can last for months or even years, depending on how often you take measurements.
Wireless Programming (OTA)
OTA means “Over The Air.” This is a special feature that lets you update the program on your Antennino without touching it. This is very useful when:
- Your device is in a hard-to-reach place
- You have many devices and don’t want to update each one by hand
- You discover a bug and need to fix it quickly
The gateway Antennino can send new programs to all the remote sensors in your network.
Comparing Antennino to Other Options
Let’s see how Antennino compares to other ways of building wireless projects:
Antennino vs Wi-Fi Boards (like ESP8266)
Wi-Fi boards are better for:
- Connecting to the internet
- Sending lots of data quickly
- Projects with constant power
Antennino is better for:
- Battery-powered devices that need to last long
- Simple sensor networks
- Areas without Wi-Fi
- Lower cost for multiple devices
Antennino vs Bluetooth
Bluetooth is better for:
- Connecting to phones and tablets
- Very short distances
- Audio devices
Antennino is better for:
- Longer distances (hundreds of meters)
- Lower power use
- Connecting many devices at once
- Simple data sharing
Antennino vs Regular Arduino + Separate Radio
Antennino wins because:
- Everything is already on one board
- Less wiring means fewer mistakes
- Smaller size for your projects
- Lower total cost
- Takes less time to set up
Common Questions About Antennino
Do I need to know programming? Basic programming helps, but Arduino has many examples you can copy and modify. You can start simple and learn as you go.
How many Antenninos can work together? You can have many remote sensors (dozens or more) all talking to one gateway. Each device gets its own address so messages don’t get mixed up.
What if I need more features? The Grove connectors make it easy to add almost any sensor or device. The Arduino community has created libraries (ready-made code) for thousands of different parts.
Is it legal to use the 433MHz frequency? In most countries, 433MHz is a free frequency for low-power devices. However, check your local regulations to be sure.
Can I build commercial products with it? For personal projects and learning, Antennino is perfect. For commercial products, you’ll need to consider certifications and possibly design your own version.
Tips for Success with Antennino
Here are some helpful tips for getting the best results:
Start Simple: Begin with basic projects. Make one Antennino read a sensor and send data to another. Once this works, add more features slowly.
Use Good Antennas: The wire antenna that comes with the module works fine, but a better antenna can greatly increase your range.
Plan for Power: Think about how you’ll power your devices before you install them. Battery-powered devices should sleep between measurements.
Test Indoor and Outdoor: The range changes a lot depending on where you use it. Walls, metal objects, and other radios can affect the signal.
Keep Your Network Organized: Give each device a clear name and number. Write down what each one does and where it is located.
Join the Community: Many people use Arduino and similar boards. Online forums can help you solve problems and find new ideas.
The Future of IoT with Antennino
The Internet of Things (IoT) is growing fast. More devices connect and share information every day. Antennino represents a smart approach to IoT:
- Low power means devices can work for years on batteries
- Simple design makes it accessible to everyone
- Open-source software means you’re not locked to one company
- Flexible use allows projects to grow over time
As you learn with Antennino, you build skills that apply to many modern technologies. Understanding sensors, wireless communication, and programming opens doors to countless projects.
Conclusion
Antennino is a powerful tool for anyone interested in building wireless devices. It combines the familiar Arduino platform with built-in radio communication, making it perfect for beginners and experienced makers alike.
Whether you want to monitor your garden, automate your home, or just learn about electronics and programming, Antennino gives you everything you need in one affordable package. The low power use, long range, and easy programming make it stand out from other options.
The best way to understand Antennino is to try it yourself. Start with a simple project, like measuring temperature and sending it to another board. As you learn, you’ll discover endless possibilities for creating smart, connected devices.
Remember, every expert started as a beginner. With Antennino and the helpful Arduino community, you have all the support you need to bring your ideas to life. The future of smart devices is in your hands—literally!
Read Next: What Is Python 54axhg5? A Simple Guide to This Mystery Bug